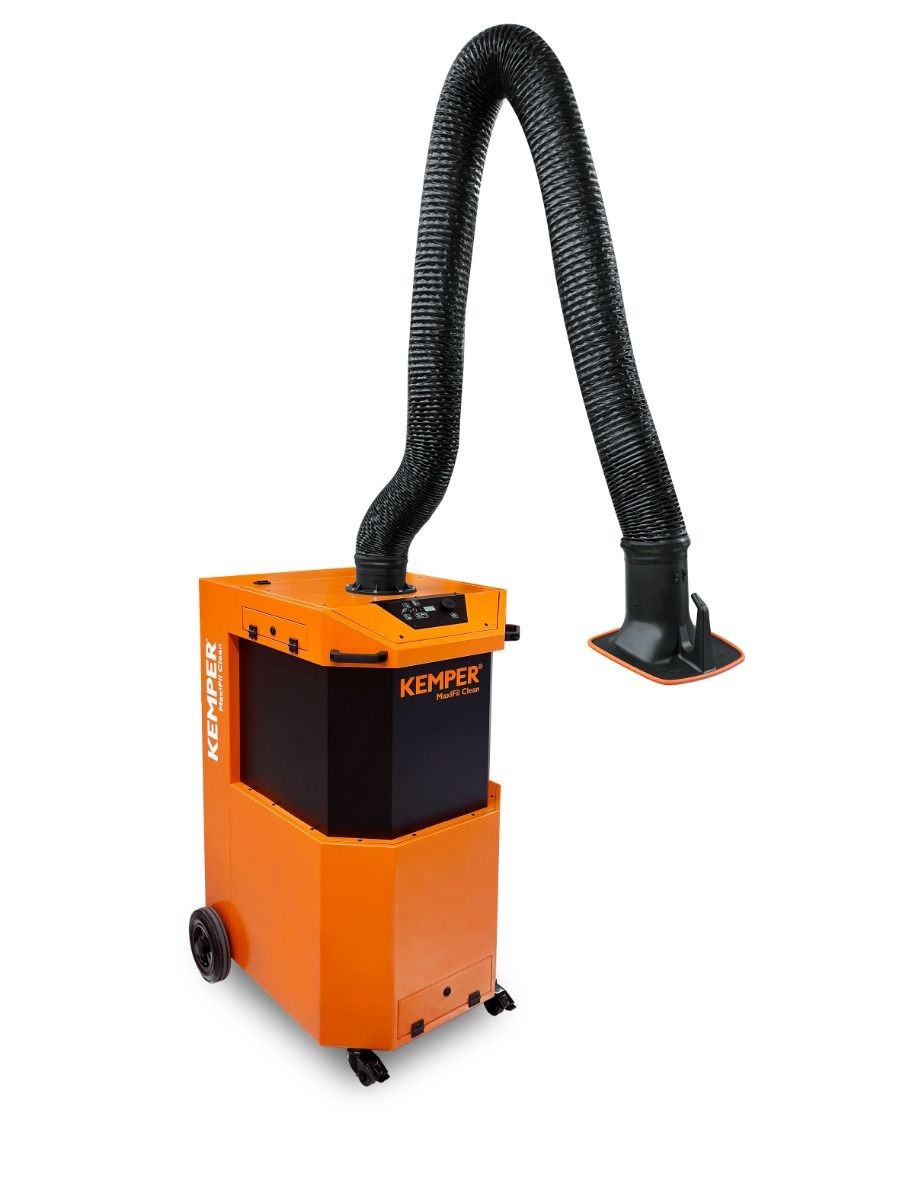
Complete Kemper MaxiFil Clean Installation Requirements: Setup Guide for Optimal Performance
The Kemper MaxiFil Clean represents a premium mobile extraction solution combining advanced filtration technology with mechanical filter cleaning in a manoeuvrable package designed for professional welding environments. Proper installation and setup of this sophisticated unit ensures optimal performance, regulatory compliance, and long-term reliability while maximizing the benefits of its advanced features.
Hall-Fast supplies the complete Kemper MaxiFil Clean range with comprehensive technical support, including detailed guidance on proper installation and setup procedures. This installation guide provides systematic information ensuring your MaxiFil Clean delivers its full performance potential from initial deployment through ongoing operation.
Pre-Installation Planning
Before installing your Kemper MaxiFil Clean, several preparatory considerations ensure optimal results:
Site Assessment:
- Verify adequate floor space for unit placement and movement
- Ensure suitable electrical supply matching unit requirements
- Confirm appropriate flooring supporting unit weight
- Assess typical welding locations relative to unit positioning
- Identify potential obstructions affecting arm movement
- Evaluate ambient conditions affecting unit performance
- Consider noise implications for surrounding work areas
Technical Requirements Verification:
- Electrical Supply: 230V/110V single-phase (model dependent)
- Circuit Protection: 16A dedicated circuit recommended
- Power Outlet: Grounded connection within cord reach
- Floor Loading: Level surface supporting approximately 80kg
- Clearance: Minimum 1m around unit for maintenance access
- Ambient Temperature: Operating range 5-40°C
- Environmental Conditions: Dry, non-condensing environment
Component Verification: Before beginning installation, confirm package contents:
- Main extraction unit with filter system
- Extraction arm in specified length configuration
- Documentation package including manual
- Accessory kit with required assembly tools
- Warranty registration information
- Quick-start guide and operational instructions
- Any optional accessories or attachments ordered
Assembly and Setup Procedure
The MaxiFil Clean installation process follows these systematic steps:
- Initial Unit Preparation:
- Remove packaging materials completely
- Inspect for any shipping damage
- Position base unit in intended operating location
- Ensure stable positioning on level surface
- Remove any transportation locks or restraints
- Verify all controls and displays are intact
- Familiarize yourself with control panel layout
- Extraction Arm Installation:
- Identify the arm mounting flange on the unit top
- Align mounting holes between arm and unit connector
- Install provided fasteners securing arm to unit
- Tighten to recommended torque specifications
- Verify free rotation of complete arm assembly
- Check all arm joints move freely without binding
- Ensure hood rotation functions properly
- Extraction Arm Adjustment:
- Set appropriate tension at each joint for optimal stability
- Verify arm maintains position without drifting
- Adjust friction elements if arm drops or is too rigid
- Test full range of motion confirming complete coverage
- Check hood adjustment for proper positioning capabilities
- Ensure smooth operation throughout full extension
- Verify proper function of hood damper if equipped
- Electrical Connection:
- Connect to appropriate power supply matching unit specifications
- Verify proper grounding through correctly wired outlet
- Position cord to prevent tripping hazards
- Consider cord management to avoid workspace interference
- Ensure power switch is accessible during operation
- Test circuit under load confirming adequate capacity
- Verify no electrical issues during initial operation
- Initial System Testing:
- Power on unit observing startup sequence
- Verify control panel illuminates correctly
- Check filter status indication showing clean filter
- Test extraction performance at different settings
- Verify mechanical cleaning system functions correctly
- Ensure proper airflow through extraction arm
- Confirm hood positioning stability during operation
- Operational Verification:
- Test automatic start/stop if equipped
- Verify filter cleaning cycle operates correctly
- Check all control functions for proper operation
- Monitor noise levels confirming normal operation
- Observe airflow patterns ensuring effective capture
- Verify wheel locks function properly securing unit
- Ensure all safety features operate as designed
Configuration and Optimization
After basic installation, several adjustments optimize performance for your specific application:
Extraction Arm Positioning:
- Position the unit to minimize arm extension for typical work
- Adjust arm joints for ideal balance between mobility and stability
- Set appropriate tension allowing position maintenance without drift
- Configure hood angle for optimal fume capture
- Position hood typically 15-20cm from welding point
- Arrange for minimal repositioning during normal work
- Verify complete working area coverage with available arm reach
Control System Settings:
- Set appropriate suction power for your specific welding process
- Configure automatic start/stop sensitivity if equipped
- Adjust filter cleaning parameters if customizable
- Set up any programmable features matching workflow
- Familiarize operators with control interface functions
- Establish appropriate airflow settings for different applications
- Configure any optional interfaces with shop systems
Operational Integration:
- Establish clear procedures for unit positioning during welding
- Train operators on proper extraction hood placement
- Develop protocols for filter monitoring and maintenance
- Create clear responsibilities for system management
- Establish movement patterns minimizing repositioning needs
- Define storage location when not in active use
- Coordinate with overall shop workflow optimization
Maintenance Preparation
Establishing proper maintenance protocols during installation ensures long-term performance:
Filter Management:
- Record installation date establishing maintenance timeline
- Note filter replacement procedures from documentation
- Establish monitoring routine for filter status
- Create maintenance schedule for regular inspection
- Identify appropriate replacement filters for future needs
- Understand cleaning cycle operation and monitoring
- Train responsible personnel on filter management
Regular Maintenance Tasks:
- Document routine inspection requirements
- Establish schedule for cleaning exterior surfaces
- Note lubrication points and recommended intervals
- Create checklist for regular operational verification
- Identify early warning signs requiring attention
- Document contact information for technical support
- Maintain records of all maintenance activities
The Kemper MaxiFil Clean represents a significant investment in workplace air quality and regulatory compliance. Proper installation and setup ensures this premium extraction system delivers its full performance potential while maximizing operational life and minimizing maintenance requirements.
View our complete Kemper MaxiFil Clean range online to explore detailed specifications, optional features, and current promotions. Our technical specialists can provide additional installation guidance specific to your workplace environment and operational requirements