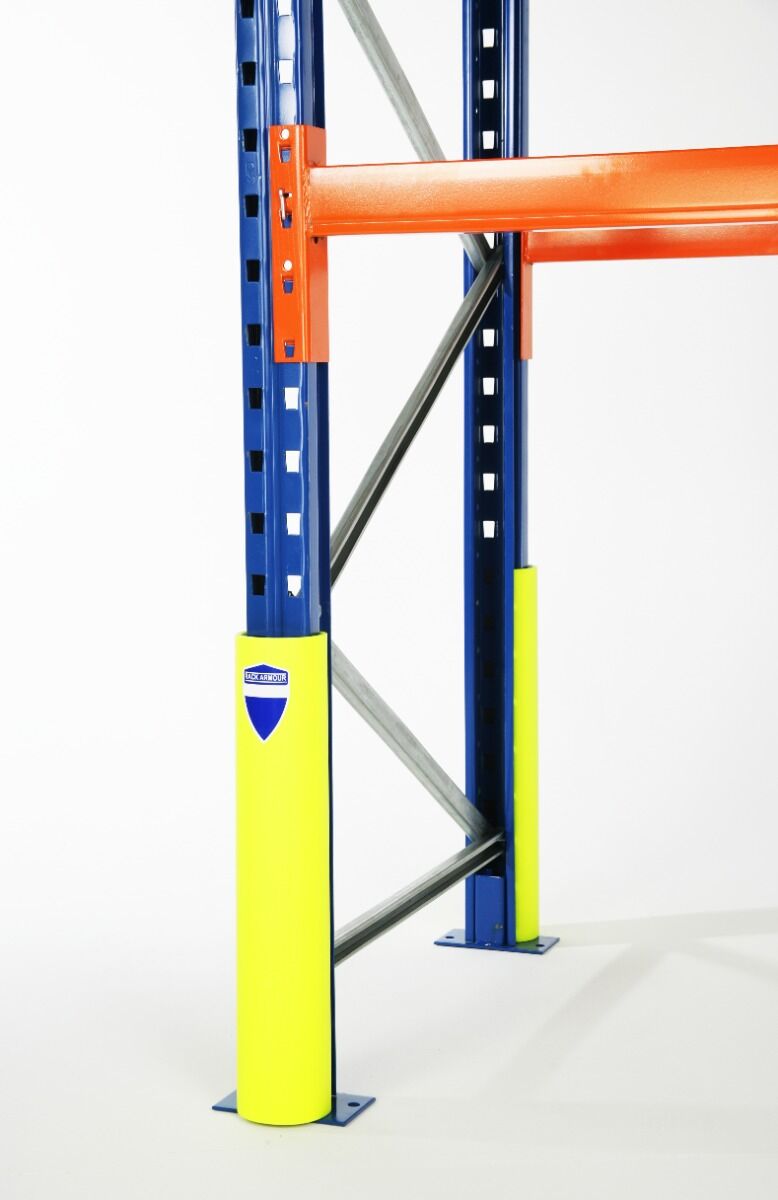
Introduction: Why Rack Armour® Has Become the UK's Default Specification
Anyone who runs a warehouse for long enough learns the same lesson the same way: pallet racking damage is one of the most expensive recurring costs in industrial operations, and almost all of it is preventable. Forklift and powered MHE impacts cause the bulk of all racking damage in UK warehouses, distribution centres, manufacturing plants, third-party logistics operations, and cold storage facilities. The repair invoices add up. The productivity loss when a bay has to be evacuated is bigger than the repair invoices. The compliance, audit, and insurance consequences when racking damage isn't dealt with properly are bigger again. And in serious cases — collapse, injury, fatality — the consequences extend to HSE enforcement, criminal liability, and reputational damage that takes years to recover from.
Rack Armour® has become the UK warehouse industry's default specification for pallet racking upright protection because it solves this problem on the right engineering principle: it absorbs and dissipates impact energy rather than transferring it into the racking leg or the warehouse floor. The patented combination of high-density polyethylene (HDPE) outer shell and energy-absorbing foam core delivers an independently verified 80% reduction in racking damage. The product is tested to FEM 10.2.16, performs across the full operational temperature range of UK warehouses (down to -40°C), clips on by hand without anchors or contractor installation, and lasts 15+ years across multiple impact cycles.
This guide is the comprehensive UK reference for Rack Armour®. It's written for the people who actually specify and buy rack protection — warehouse managers, facilities engineers, H&S officers, procurement teams, and the consultants who advise them. It covers the full Rack Armour® range across all five upright sizes and both colour finishes, the engineering principles behind why the product works, the FEM and HSE compliance framework that supports its use, the lifecycle cost economics that justify the investment, the sector-by-sector application patterns we see across our customer base, and the practical realities of installing and maintaining the product across single-site and multi-site projects.
By the end of the guide, you should be able to identify the right Rack Armour® size and colour for your racking, plan a site-wide or multi-site rollout, and know what supporting documentation to keep for compliance, audit, and insurance purposes. If you'd rather skip ahead and talk to a Hall-Fast specifier directly, contact our team and we'll walk you through the right specification for your warehouse.
Hall-Fast stocks the full authentic Rack Armour® range, supports buyers from single-bay orders through to multi-site network rollouts, and operates a price match promise on every authentic Rack Armour® product — if you find a better price anywhere on the internet or have received a written quotation, send it through and we'll match it.
Part 1: Why Pallet Racking Damage Costs So Much More Than the Repair
The headline cost of racking damage is the repair invoice. A bent upright might cost a few hundred pounds to replace, plus the racking inspector's fee. That's the visible number — and on its own, it's enough to make rack protection a sensible spend. The hidden numbers are where the actual case for protection lives.
When an upright fails an inspection, the immediate consequence is bay isolation. The damaged section is taken out of service, the stock relocated, and the affected aisle closed off until repair is complete. For high-throughput operations, every hour of bay isolation means rerouted picking flows, reduced throughput, and direct cost in lost productivity. On a busy distribution centre running tight order cycles, the productivity cost of a single damaged upright comfortably exceeds the cost of the repair within hours. On a 3PL operation working to customer SLAs, missed despatch deadlines compound the cost further through service-level penalties.
Beyond the immediate productivity cost sits the compliance and insurance dimension. The Health and Safety Executive treats damaged racking seriously. Under HSE guidance and the FEM 10.2.03 standard for racking inspection, damaged racking that hasn't been identified, isolated, or repaired exposes the operator to potential enforcement action and, in the event of a collapse or injury, to criminal liability under the Health and Safety at Work Act. Insurance assessors take the same view: visible racking damage is an immediate red flag that affects renewal premiums and can affect claims handling if an incident occurs. Customer auditors operating under BRC, ISO 45001, ISO 9001, and similar regimes increasingly look for documented rack protection on inspection, and damaged uprights without protection in place will reliably trigger non-conformance findings.
There's also a longer-term cost picture that often gets overlooked. Repeated damage to the same upright accelerates wear on the racking system as a whole. Bays where uprights have been replaced multiple times often show secondary issues — connector wear, bracing damage, baseplate degradation, and cumulative damage to floor anchors — that compound the original cost. A racking system that should last 25 years can be on its second or third major replacement cycle in 15 years if the lower legs aren't protected. Capital expenditure that should have been deferred is brought forward by a decade or more, and the cumulative cost can run to six figures across a single distribution centre.
The economics of protecting the lower section of the upright — the strike zone, the lower 600mm of the leg where the bulk of forklift damage concentrates — work out clearly across:
The avoided immediate repair invoices over the lifecycle. The avoided productivity loss from bay isolation events that don't happen. The reduced insurance premium pressure from a clean rack-damage record. The improved audit performance from documented rack protection. The extended overall racking system service life from upright legs that aren't repeatedly being replaced. The reduced HSE exposure in the event of an incident, where documented preventive action carries weight.
This is why most serious warehouses now treat rack protection as standard equipment rather than discretionary spend, and why Rack Armour® has become the default specification across the UK warehouse sector.
Part 2: What Rack Armour® Actually Is
Rack Armour® is a clip-on pallet racking upright protector, fitted to the lower 600mm of the racking leg — the section where forklift and MHE impacts occur. Every product in the range, regardless of size or colour, consists of three engineered elements working together.
The outer shell is moulded from high-density polyethylene (HDPE), a tough impact-resistant thermoplastic widely used in industrial applications where flex and recovery matter more than rigidity. The shell wraps around the front and sides of the upright, leaving the back open so it can clip into place. The shape is patented — the curvature is designed to deflect impacts laterally, redirecting force away from the upright rather than transmitting it through. HDPE doesn't rust, doesn't corrode, doesn't flake or chip, and recovers its original shape after typical impact loading.
The inner foam core is a high-density energy-absorbing foam bonded to the inner surface of the HDPE shell. Where the shell deflects the impact, the foam absorbs it — converting kinetic energy from the forklift strike into heat and into the work done compressing the foam, before any of that energy can reach the racking leg. The foam recovers between impacts, which is why a single Rack Armour® unit typically absorbs multiple strikes across its 15+ year service life without needing replacement.
The clip mechanism is integral to the moulded shell and sized precisely to grip the front-facing width of standard pallet racking uprights. The clip tension is tight enough that the protector stays in place after impact (rather than being knocked off, which is a common failure mode in cheaper unbranded alternatives), but designed to be installed and removed by hand without tools, anchors, or fixings. The clip-on installation is fundamental to the product's value proposition — no contractors, no floor drilling, no operational disruption during fitting.
The combined effect is a protector that fits in seconds, stays put under repeat impact, integrates visually with warehouse safety infrastructure through its high-visibility yellow finish, and lifts off in seconds for the rack inspections required under FEM and HSE guidance. There are no welds, no painted steel, no anchor bolts, no concrete drilling, and no floor damage. The whole system is designed for the realities of warehouse operation: fast deployment, low maintenance, and long service life under continuous use.
The product is manufactured to international quality standards and independently tested to FEM 10.2.16, the European racking impact protection standard. It performs across the full operational temperature range of UK warehouses — from ambient through to -40°C cold storage — and resists moisture, corrosion, and most industrial solvents. The full range, both colour finishes, and the matching installation tools are stocked at Hall-Fast and available on the Rack Armour® brand page.
Part 3: The Engineering — How Rack Armour® Works
The fundamental engineering question for any rack protection product is: where does the impact energy go?
When a forklift strikes a racking upright at warehouse speed (typically 5-10 mph), the kinetic energy involved is substantial. A 5,000kg forklift moving at 8 mph carries roughly 25 kJ of kinetic energy at the moment of impact. That's more than enough to plastically deform a steel upright if the energy is directed straight into it. Smaller MHE — reach trucks, powered pallet trucks, electric stackers — carries proportionally less energy, but still enough to bend an unprotected leg in a single strike. The protective product's job is to manage that energy in a way that doesn't damage the racking.
Steel column guards approach the problem by trying to block the force. The guard is rigid, anchored to the floor, and built from heavier-gauge steel than the racking it protects. In theory, the impact loads the guard rather than the upright. In practice, this only works as long as the guard doesn't move — which is rarely the case for long. Floor anchors loosen under repeat loading, the concrete spalls around the bolt holes, and on a serious impact the guard deflects into the upright anyway, often causing more damage than the impact would have caused without the guard. The guard becomes scrap, the floor needs anchor repair, and the racking is still damaged. The energy hasn't disappeared — it's been transferred from the impact zone into the upright, the floor, the bolts, and the surrounding structure.
Rack Armour® approaches the problem by absorbing the energy rather than blocking it. The HDPE shell deflects on impact — it's designed to flex visibly under load, not to resist deflection — converting some of the kinetic energy into elastic deformation. The foam core then absorbs the remaining energy through controlled compression: as the foam compresses, the kinetic energy is converted into heat and into work done deforming the foam material itself. By the time the impact pulse reaches the upright (if it reaches the upright at all), most of the original kinetic energy has been dissipated.
This is the same engineering principle used in vehicle crumple zones, bicycle helmets, motorcycle helmet liners, and a wide range of impact-absorbing safety products. It's well-established physics, and the 80% damage reduction figure verified in independent testing is consistent with what's predictable from a properly engineered HDPE-and-foam absorption system. The protector is fundamentally sacrificial — it's designed to take the damage so the racking doesn't.
A few practical consequences follow from this engineering choice.
The protector itself shows signs of impact after a serious strike — visible scuffs, dents, foam compression, or HDPE marking. This is by design. The product is meant to look like it's done its job. A scuffed or dented Rack Armour® unit is performing exactly as intended. Inspection after a known impact event, and either confirming the unit can continue in service or replacing it, is part of the normal lifecycle of warehouse rack protection — and dramatically cheaper than upright replacement.
Repeated impacts on the same protector eventually exhaust the foam's absorption capacity. The 15+ year service life assumes typical warehouse impact frequency. On exceptionally high-impact installations — particularly drive-in racking, end-of-aisle positions on busy routes, and specific bays with consistent forklift contact — individual protectors may need earlier replacement. This is still preferable to upright replacement, since the protector cost is a small fraction of the cost of a damaged racking leg, and the protector replacement is a clip-off-clip-on job rather than a contractor visit.
The clip-on installation matters for the engineering. Because the protector isn't anchored to the floor, the impact energy can't be transferred from the protector into the floor or the floor anchor zone. The protector deforms locally, the foam absorbs locally, and the energy is dissipated locally. This is one of the reasons Rack Armour® is often the only acceptable specification on engineered floor installations like very narrow aisle (VNA) racking, where floor flatness specifications are tight and floor-anchored steel guards would compromise the floor specification.
Part 4: The Complete Rack Armour® Range — Five Sizes, Two Colours, Two Installation Tools
The Rack Armour® range stocked at Hall-Fast is straightforward in structure but precise in execution. There are five upright sizes covering all standard UK pallet racking profiles, two colour finishes for different site visibility requirements, and two installation tools designed for project-scale rollouts.
The Small (Euro A) is sized for front-facing upright widths up to 87mm. This is the lighter end of the racking spectrum — typical applications include light-duty pallet racking, mezzanine support legs, archive and document storage, retail back-of-house storage, and smaller-profile uprights used alongside heavier racking in mixed installations. If your warehouse runs predominantly larger racking but has a smaller-profile section for lighter goods or mezzanine support, the Small is the right specification for that section. Available in both Hi-Vis Yellow and Safety Yellow.
The Medium (Euro B) fits uprights up to 100mm wide. This is the workhorse size of the UK warehouse industry — Euro B is the most common upright width across standard pallet racking systems, including most Dexion, Link 51, Mecalux, and equivalent profiles. If you're doing a site-wide rollout across a typical UK distribution or fulfilment operation, the Medium is usually the volume order. For most warehouses, this single size will cover the majority of uprights, with smaller and larger sizes filling specific bays. Available in both Hi-Vis Yellow and Safety Yellow.
The Large (Euro C) fits uprights from above 100mm and up to 110mm wide. This sits on heavier-duty racking — taller bays, heavier pallets, and greater loads per beam. Common applications include large distribution and fulfilment centres, third-party logistics operations, cold and chilled storage, automotive and engineering stores, and heavy manufacturing. The Large is the typical specification for warehouses running counterbalance forklifts and reach trucks at speed near racking. Available in both Hi-Vis Yellow and Safety Yellow.
The XL (Euro D) covers uprights above 110mm and up to 120mm wide. This is the size for genuinely heavy-duty racking — drive-in and drive-through systems where forklifts operate inside the rack run, high-bay pallet racking in larger distribution centres, beverage and FMCG storage with heavy pallet weights, automotive parts warehouses, and bespoke heavy-load systems. The XL is also commonly specified on narrow-aisle and very-narrow-aisle (VNA) installations where impact consequences are particularly serious. Available in both Hi-Vis Yellow and Safety Yellow.
The XXL (Euro E) is the largest size in the range, fitting uprights above 120mm and up to 135mm wide. This sits on the heaviest standard pallet racking — pallet shuttle and semi-automated racking, very high-bay storage, deep-lane and drive-in heavy-load systems, automotive and tyre warehousing, and bespoke engineered racking for unusually heavy loads. If your uprights are wider than 135mm, you're outside the standard Rack Armour® range and should contact Hall-Fast directly for advice on alternative protection approaches. Available in both Hi-Vis Yellow and Safety Yellow.
All five sizes are 600mm tall — matching the strike zone where forklift damage concentrates on the lower section of the racking leg. All five share the same patented HDPE shell, foam core, clip-on installation, FEM 10.2.16 testing, -40°C operating range, and 15+ year service life. The performance is uniform across the range; only the dimensions vary to fit different upright profiles.
For site-wide rollouts, Hall-Fast also stocks the two installation tools in the Rack Armour® range. The Small/Medium installation tool is designed for repetitive bulk installation of Euro A and Euro B protectors, optimising for speed and ergonomics across multi-day projects. The Large/XL/XXL installation tool provides leverage for the stiffer clip tensions on Euro C, D, and E protectors, and is the practical default for any site rolling out the larger sizes in volume. Neither tool is strictly necessary — Rack Armour® clips on by hand — but for rollouts of more than a hundred or so units, the tools meaningfully reduce installation time and installer strain.
Part 5: How to Choose the Right Size
The right size is determined by the front-facing width of your racking upright, measured in millimetres across the front face of the leg with a tape measure or vernier caliper. This is the dimension that matters — not the depth of the upright, not the height, just the width across the front. The five Rack Armour® sizes correspond directly to upright width brackets.
| Upright Front-Facing Width | Rack Armour® Size | Typical Racking Application |
|---|---|---|
| Up to 87mm | Small (Euro A) | Light-duty pallet racking, mezzanine support legs, archive and document storage, smaller-profile uprights in mixed installations |
| Above 87mm and up to 100mm | Medium (Euro B) | Standard UK pallet racking — the most common upright size across distribution centres, fulfilment operations, manufacturing stores, and general warehouse use |
| Above 100mm and up to 110mm | Large (Euro C) | Heavier-duty racking, mixed-MHE warehouses, large distribution centres, 3PL operations, cold storage, and engineering stores |
| Above 110mm and up to 120mm | XL (Euro D) | Drive-in and drive-through systems, high-bay pallet racking, beverage and FMCG storage with heavy pallet weights, narrow-aisle racking |
| Above 120mm and up to 135mm | XXL (Euro E) | Pallet shuttle and semi-automated racking, very high-bay storage, deep-lane systems, the heaviest standard industrial racking |
If your uprights are wider than 135mm, you're outside the standard Rack Armour® range — contact us with your racking specification and we'll advise on the right protection approach for non-standard installations.
A few practical points worth knowing when measuring.
Most UK warehouses run a single upright profile across the bulk of the building, but mixed installations are common. Older bays may use a different profile to newer bays, specialist sections often run heavier-duty racking, and mezzanines typically use lighter profiles. A site survey at the specification stage will tell you whether you need one size or a mix — and if it's a mix, roughly in what ratio.
The Euro B / Medium size covers the majority of standard UK pallet racking. If you don't know your upright size and your racking looks like typical warehouse pallet racking, the Medium is the most likely fit. Confirm by measuring before you order.
Photographs of the upright with a tape measure across the front face are the quickest way to confirm sizing remotely. If you're unsure, take a few photos showing the measurement clearly and send them through our contact page. We'd rather verify the size before you order than have you receive the wrong specification.
For mixed-size sites, the most common pattern we see at Hall-Fast is a Medium volume order with smaller quantities of Small and Large filling specific sections. Heavier specialist installations may need a mix of Large, XL, and XXL. Multi-site networks running comparable racking across sites can usually standardise on one or two sizes across the estate.
Part 6: Hi-Vis Yellow vs Safety Yellow — How to Choose the Right Finish
Both Rack Armour® finishes deliver identical impact protection. Both are tested to FEM 10.2.16. Both have the same 15+ year service life, the same -40°C operating range, and the same 80% damage reduction performance. The choice between them is purely about visual integration into your warehouse — but it's a decision worth getting right, because rack protection is highly visible and the wrong colour reads as inconsistent across an aisle or a site.
Safety Yellow is the classic industrial warning yellow. It's the shade you'll find on bollards, kerb protection, traffic barriers, hazard signage, and floor line marking across virtually every UK warehouse. Specifying Rack Armour® in Safety Yellow keeps the rack protection visually integrated with everything else — the protector reads as part of the building's coordinated safety system rather than as an aftermarket bolt-on. For sites with formal facility colour standards, written into specifications, drawings, or procurement frameworks, Safety Yellow is usually the only specification that satisfies the standard.
Safety Yellow tends to be the right choice for multi-site networks. When you're rolling out rack protection across a 3PL portfolio, a retail DC network, a multi-site FMCG operation, or a national parts distribution chain, you want one specification that works in every building regardless of local lighting conditions, age, or fit-out contractor. Safety Yellow integrates universally; Hi-Vis Yellow can read as non-standard against an established palette.
The third reason to specify Safety Yellow is long-term colour stability. The standard industrial pigment used in Safety Yellow holds its appearance well across the 15+ year service life. Fluorescent finishes — including Hi-Vis Yellow — can fade more visibly under UV exposure or heavy cleaning regimes, particularly on installations with skylights, translucent roof panels, or any partial outdoor exposure. For covered yard storage, agricultural buildings, or warehouses with significant rooflight coverage, Safety Yellow is the more forgiving long-term choice.
The Safety Yellow range covers all five sizes — Small (Euro A), Medium (Euro B), Large (Euro C), XL (Euro D), and XXL (Euro E).
Hi-Vis Yellow is the brighter, more fluorescent finish, and it earns its place in specific environments. The most obvious is cold and frozen storage, where ambient lighting tends to be lower and where the brighter finish gives forklift drivers a stronger visual cue at the base of the rack. Dim picking aisles, deep racking interiors, and any zone where contrast matters more than coordination are good candidates for Hi-Vis.
The other strong case for Hi-Vis is on installations where the protector needs to function as an active visual warning beyond its impact role. Drive-in racking is a clear example — forklifts operate inside the rack run, sight lines are tighter, and the brighter finish at the entry to each lane gives a stronger visual cue than Safety Yellow can. Pallet shuttle systems work the same way: the racking is engineered for high-density storage, the operating environment is constrained, and additional visibility helps drivers position trucks accurately at the lane entry.
The Hi-Vis Yellow range covers all five sizes — Small (Euro A), Medium (Euro B), Large (Euro C), XL (Euro D), and XXL (Euro E).
Many sophisticated warehouses end up specifying both colours within a single project. The pattern is: Safety Yellow as the building standard for the bulk of the racking, with Hi-Vis Yellow as a zone-specific exception for the cold store, the dim aisles, the drive-in section, or any other zone where contrast matters. Hall-Fast quotes both finishes within a single project order, which means your specification can match the operational reality of the building rather than forcing one colour everywhere — send your specification through and we'll quote both within one project.
Part 7: Rack Armour® vs Steel Column Guards — An Honest Comparison
This guide is published by Hall-Fast, which has a commercial interest in selling Rack Armour®, so it's worth being explicit: there are situations where steel column guards remain the right specification. Understanding which situations those are will help you specify the right protection for your site rather than over-applying any single product.
Where steel column guards make sense. Heavy steel column guards are appropriate for protecting the bases of structural columns — the load-bearing columns of the building itself, not racking uprights. They also have a place at the ends of racking aisles where impact frequency is very high and the consequences of a struck guard going into a racking leg matter less than absolute physical interception. Some specialist applications — heavy automotive workshops, certain manufacturing settings, high-impact loading docks — also lean toward steel.
Where Rack Armour® is the better choice. For protecting pallet racking uprights specifically, Rack Armour® is the better specification for almost every standard UK warehouse, and the engineering reasons are clear.
The primary issue with steel column guards on racking uprights is energy transfer. A steel guard fixed to the floor is rigid; it doesn't absorb the impact, it transfers it. The energy goes into the guard, then into the floor anchor, and ultimately into the upright if the guard deflects. On a serious impact, the guard itself deforms into the upright, often causing more damage than the impact would have caused without protection. The floor anchor zone is also a vulnerability — repeated impacts loosen the anchors, spall the concrete, and require floor repair work that interrupts operations and adds to lifecycle cost.
The secondary issue is inspection. Rack inspections under FEM and HSE guidance require the inspector to see the upright clearly, particularly the lower section where damage concentrates. Floor-anchored steel guards obstruct that view and often have to be removed or worked around for proper inspection, which adds inspection time and cost. Rack Armour® lifts off in seconds for inspection and clips back on just as quickly — the inspection workflow is faster and less disruptive.
The third issue is installation impact. Steel column guards require floor drilling, anchor fixing, and contractor installation. On engineered floor installations — VNA racking, automated systems, anywhere with a floor flatness specification — anchor work is often unacceptable because it compromises the floor specification and can void warranties. Rack Armour® clips on by hand without touching the floor, which is why it's frequently the only viable specification on these installations.
The fourth issue is total cost over the racking lifecycle. Steel guards have a lower unit price than Rack Armour® in many cases, but the lifecycle cost picture is different once you include floor repair, contractor installation, replacement after serious impacts, and the cost of repaired uprights that the steel guard didn't actually protect. Across a 15+ year racking lifecycle, Rack Armour® usually works out cheaper despite a higher initial unit cost.
A practical pattern that works well for many warehouses is to use Rack Armour® on the standard racking uprights, and reserve steel column guards for end-of-aisle positions, structural columns, and specialist high-impact zones. That gives you absorption protection where the racking is, and rigid interception where rigid interception is genuinely the right answer. Hall-Fast also stocks complementary impact and wall protection products for these adjacent applications.
Part 8: FEM Standards and Compliance — What You Need to Know
Compliance is one of the underrated reasons to specify branded, tested rack protection rather than generic alternatives. Unbranded plastic or steel guards may protect adequately in straightforward conditions, but they don't come with the supporting documentation that an HSE inspection, customer audit, or insurance assessment will ask for if something goes wrong.
Rack Armour® is independently tested to FEM 10.2.16, the European Federation of Materials Handling standard for racking impact protection. This is the recognised reference standard for rack protector performance and provides the testing framework that demonstrates a protector achieves what it claims to achieve. Specifying FEM 10.2.16-tested protection contributes to demonstrable due diligence under the Health and Safety at Work Act, supports compliance with the broader FEM 10.2.03 standard for racking inspection, and provides the documentation trail that auditors and insurers expect to see.
The broader FEM standard ecosystem is worth understanding because it interacts with rack protection in important ways.
FEM 10.2.02 covers the user requirements for static pallet racking systems — the standard that defines what the racking itself should be capable of, how it should be loaded, and how it should be operated. This is the standard your racking is designed to.
FEM 10.2.03 is the standard for the inspection of static pallet racking, covering inspection regimes, damage classification, and the action thresholds for repair or replacement. Damage is classified as green (acceptable, no action), amber (action required within four weeks), or red (immediate offload and repair required). This is the standard your annual rack safety inspection works to. Most UK operators run annual SEMA-approved inspections to FEM 10.2.03.
FEM 10.2.16 covers the design and testing of impact protection devices for adjustable pallet racking. This is the standard your rack protectors should be tested to. Unbranded protectors typically aren't.
For most UK warehouse operators, the practical compliance implications break down as follows.
You should be running annual rack inspections under FEM 10.2.03 by a competent person, typically a SEMA-approved inspector. Damage classifications under FEM 10.2.03 trigger action: green is acceptable, amber requires action within four weeks, red requires immediate offload and repair. Records of inspections, findings, and actions taken should be kept for at least the life of the racking system.
You should be using FEM 10.2.16-tested protection on your uprights, and you should keep the documentation that proves this — manufacturer specifications, test certificates, and ideally photographs of installations — as part of your H&S records. Rack Armour® comes with this documentation; many cheaper alternatives don't.
You should keep records of any impacts that occur, including which protectors were involved and whether they remained serviceable or required replacement. This is good practice for ongoing maintenance and essential evidence in the event of any future enquiry into a serious incident.
Customer audits under BRC, ISO 45001, ISO 9001, and similar regimes increasingly look for documented rack protection on inspections. Specifying authentic Rack Armour® and keeping the supporting documentation makes that part of the audit straightforward.
Hall-Fast can supply the relevant Rack Armour® specifications, FEM 10.2.16 test data, and product documentation to support your audit and compliance files — request the documentation through our contact page. This is one of the practical advantages of buying through an authorised stockist rather than an unbranded import: the paper trail exists when you need it.
Part 9: Lifecycle Cost — The Real Economics of Rack Armour®
Rack protection is one of those investments where the up-front unit cost is the wrong number to focus on. The right number is the cost over the lifecycle of the racking system — typically 25 years for well-specified pallet racking — and the avoided costs across that period. Understood properly, rack protection is one of the highest-return investments available to a warehouse operator.
The cost components of unprotected racking damage, over a 25-year racking lifecycle, typically include:
Direct repair costs. Each damaged upright requires inspection, isolation, repair (usually replacement of the affected leg section), and re-certification. Full upright replacement on a single bay typically costs £400-£1,200 depending on racking type and access; specialist heavy-duty replacements run higher. Across a 25-year lifecycle, an unprotected warehouse with regular forklift contact will see multiple repair events on the most exposed uprights — the cumulative cost across a 100-bay warehouse can comfortably exceed £20,000 over the racking lifetime.
Productivity loss during bay isolation. Each repair event takes the affected bay out of service for the duration of the inspection and repair work — typically several days, longer if specialist parts are required. The productivity cost of bay isolation depends heavily on the operation; a tight-throughput distribution centre may lose £500-£2,000 per day per isolated bay through rerouted picking, slower cycles, and missed despatch windows.
Insurance premium impact. Insurers look at rack damage history at renewal. Operations with regular damage and inadequate protection face premium pressure that compounds across renewal cycles. A 5-10% premium uplift on a six-figure insurance policy adds up significantly over 25 years.
Audit and customer SLA impact. Documented racking damage on inspection visits affects audit scores and can affect customer contract renewals. The cost is hard to quantify but real — and rises with the importance of any single customer relationship.
HSE and incident exposure. Rare but extremely high-cost. A single rack collapse with associated injury can result in HSE enforcement, civil claims, criminal prosecution under HASAWA, and reputational damage running into seven figures. The probability is low; the cost when it occurs is uncapped.
Cumulative racking system degradation. Repeatedly repaired uprights show secondary issues over time — connector wear, baseplate damage, alignment drift — that accelerate the eventual replacement of the whole racking system, bringing forward capital expenditure that should have been deferred.
Against this, the cost of Rack Armour® protection is straightforward. A unit cost per protector, a one-off install (no contractors, no floor work, no operational disruption), a 15+ year service life with multiple impacts absorbed before replacement, and an 80% reduction in damage events across the protected period.
The break-even maths works at very low impact frequencies. For a warehouse where unprotected uprights would see one significant damage event every five years, Rack Armour® pays back inside its first impact cycle on direct repair cost alone — before counting productivity, insurance, audit, or HSE benefits. For warehouses with higher impact frequencies — distribution centres, 3PLs, cold stores — the payback period is measured in months, not years.
This is why most serious operators have moved from "should we install rack protection" to "we install rack protection on every bay at refit, and on every uprated section as it's commissioned." The lifecycle economics make any other approach indefensible. For multi-site operators, Hall-Fast quotes project pricing on multi-site rollouts that brings the per-unit cost down further.
Part 10: Sector-by-Sector Application Guide
Rack Armour® is specified across virtually every industry that runs pallet racking and powered MHE. The application patterns vary by sector, and recognising the common cases can help you sense-check your own specification against industry practice.
Distribution and fulfilment centres typically run a mix of Medium (Euro B) for standard racking and Large (Euro C) or XL (Euro D) for heavier-duty zones. Hi-Vis Yellow is common in main aisles where speed and contrast matter; Safety Yellow tends to dominate quieter zones and any audited operations. End-of-aisle positions usually combine Rack Armour® on the racking with bollards or traffic management products at the corners.
Cold and frozen storage is one of the strongest use cases for Hi-Vis Yellow, because ambient lighting tends to be lower and the brighter finish is visibly clearer to drivers. The -40°C operating rating is a hard requirement that not all rack protectors meet, and is one of the key reasons Rack Armour® is specified across the sector. Cold storage operations frequently combine Hi-Vis Medium on standard racking with Hi-Vis Large or XL on heavier sections.
Manufacturing and engineering stores often run a mix of upright sizes depending on what's stored. Heavy components and tooling drive Large and XL specifications; lighter goods and consumables use Medium. The audit regime in manufacturing — particularly automotive and aerospace — usually drives Safety Yellow as the standard, with documentation kept for IATF 16949, AS9100, and similar quality standards.
Third-party logistics (3PL) operations are often multi-client sites with varied racking and continuous operations. Standardisation matters here — most 3PLs settle on Medium and Large in Safety Yellow as the network default, with site-specific exceptions where the racking or environment requires it. Multi-site 3PL networks frequently order through Hall-Fast project pricing to get consistent specification across the estate.
Beverage, FMCG, and food storage drives heavy pallet weights and high turnover. XL and XXL specifications are common, particularly on drive-in and high-bay racking. Cold storage food operations often combine Hi-Vis for the freezer and Safety Yellow for the ambient sections. BRC certification drives strong demand for documented rack protection in this sector.
Automotive parts and tyre warehousing typically runs heavy-duty racking with high-value stock. Audit regimes are usually formal — automotive supply chains run to IATF 16949 and customer-specific quality standards — and Safety Yellow dominates as the building standard. XL and XXL sizes are common, often combined with larger-diameter bollards at end-of-aisle positions.
Builders' merchants and steel stockholders run heavy-duty racking, often with covered yard storage and partial outdoor exposure. Safety Yellow's UV stability over the 15+ year service life is a meaningful advantage in these environments. XXL and XL specifications dominate, frequently combined with longspan shelving for lighter goods sections.
Agricultural feed and grain stores use heavier-duty racking in robust rural and industrial conditions. The full operational temperature range and corrosion resistance of Rack Armour® suits these environments well, and the clip-on installation handles the dust and debris common in agricultural settings without needing access to anchor points.
Retail and wholesale back-of-house typically runs lighter racking in space-constrained zones. Small and Medium specifications are common, often in the same Safety Yellow used elsewhere in the retail estate. Multi-site retail rollouts benefit from network-level standardisation through Hall-Fast.
Pharmaceutical and healthcare distribution runs to demanding audit regimes (MHRA, GDP, GxP) with extensive documentation requirements. Safety Yellow dominates as the building standard, and the documented FEM 10.2.16 testing of authentic Rack Armour® supports the compliance file.
Aerospace and defence storage combines heavy racking with stringent audit and traceability requirements. Specification typically follows the controlling quality standard (AS9100, NADCAP) and extends to documenting the rack protection product, batch, and installation date in the facility records.
If your operation isn't on this list, the pattern is likely still recognisable: any environment with pallet racking and forklifts is a candidate for Rack Armour®, with the specific size and colour determined by the racking profile and the operating conditions. For a specifier's opinion on the right choice for your environment, contact the Hall-Fast team.
Part 11: Installation Playbook — From Single Bay to Multi-Site Rollout
One of Rack Armour®'s defining features is that the entire installation lifecycle — fitting, inspection, removal, and replacement — is designed to be done in-house by warehouse staff, without contractors, drilling, or specialist tools. This determines how realistic it is to roll protection out across a full site, maintain it over time, and respond to inspection findings.
Fitting. Each Rack Armour® protector clips onto the upright by hand. The protector slides on from above and presses into place at the base. For Small and Medium sizes, the clip tension is light enough that any member of the warehouse team can fit one in seconds without instruction. For Large, XL, and XXL sizes, the clip tension is higher (which is what keeps them on after impact) and the matching fitting tool is recommended for bulk installs.
The Small/Medium installation tool is designed for repetitive bulk installation of Euro A and Euro B protectors. The value here isn't leverage — the smaller sizes don't need it — but speed and ergonomics. Fitting hundreds of protectors at floor level by hand introduces real strain across a multi-day project, and the tool keeps each fitting fast and consistent. Across a typical 500-unit Medium rollout, the tool will save several hours of installer time and substantially reduce the manual handling load.