How to Install Oddie 1/4 Turn Fasteners: Step-by-Step Guide with Tips and Troubleshooting
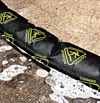
Oddie quarter turn fasteners have become the go-to solution for securing access panels and removable components across numerous industries. Their elegant design combines quick release functionality with secure holding power, making them ideal for applications requiring frequent access. This comprehensive installation guide walks you through the entire process of selecting, installing, and troubleshooting Oddie fasteners to ensure optimal performance in your specific application.
Understanding Oddie Quarter Turn Fasteners Components
Before beginning installation, it's important to familiarize yourself with the components of an Oddie fastener system:
Standard Oddie Fastener Components
A complete Oddie quarter turn fastening system consists of:
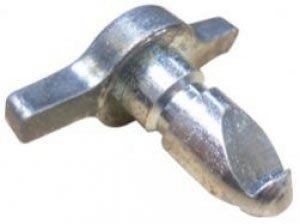
- Stud Assembly: The male component mounted to the removable panel, featuring:
- Stud Body: The main shaft with mounting threads
- Stud Head: The portion that rotates 90° to engage/disengage (available in various styles)
- Retaining Washer: Secures the stud to the panel while allowing rotation
- Receptacle: The female component mounted to the fixed structure, including:
- Receptacle Housing: The main body with mounting holes
- Engagement Mechanism: Internal features that capture the stud head
- Spring Element: Provides tension for secure engagement
- Mounting Hardware: Typically including:
- Nuts and Washers: For securing components to the panels
- Screws: For receptacle mounting in some configurations
- Retaining Clips: Used in certain installation methods
Common Variations in Oddie Fastener Designs
Oddie fasteners come in several variants to accommodate different applications:
- Flush-Mount Designs: Where minimal protrusion is required
- Extended-Reach Versions: For applications with significant panel gaps
- Heavy-Duty Variants: With reinforced components for demanding applications
- Miniature Series: For space-constrained installations
- Security Versions: Featuring specialized head designs requiring specific tools
Understanding which variant you're working with is essential for proper installation.
Pre-Installation Planning and Preparation
Successful installation begins with proper planning:
Determining Proper Placement
Strategic positioning of Oddie fasteners ensures optimal performance:
- Edge Distance: Maintain minimum distance from panel edges (typically 2-3 times the hole diameter)
- Spacing Guidelines: For large panels, space fasteners at 150-300mm intervals depending on sealing requirements
- Corner Placement: Position fasteners 25-50mm from corners for proper sealing
- Accessibility Consideration: Ensure adequate clearance for operation and tool access
- Load Distribution: Place fasteners to evenly distribute holding forces
Proper planning prevents issues with panel distortion, inadequate sealing, or difficult operation.
Required Tools and Materials
Gather these items before beginning installation:
Essential Tools:
- Measuring tools (tape measure, ruler)
- Marking implement (pencil, marker)
- Centre punch for marking hole centres
- Drill with appropriate bits (step drill recommended for sheet metal)
- Screwdriver matching the stud head style
- Spanner or socket set for nut tightening
- Deburring tool for cleaning drilled holes
Optional Tools:
- Alignment jig for multiple fastener installations
- Thread-locking compound for permanent installations
- Anti-seize compound for stainless steel hardware
- Torque screwdriver/wrench for precise tightening
Materials Checklist:
- Complete Oddie fastener assemblies
- Appropriate mounting hardware
- Panel reinforcement material (if needed for thin panels)
- Gasket material (if required for sealing)
Having all necessary items prepared saves time and ensures proper installation.
Step-by-Step Installation Process for Oddie Quarter Turn Fasteners
Follow these detailed steps for successful installation:
Step 1: Marking and Preparation
Accurate marking forms the foundation for proper installation:
- Position Determination: Decide on optimal fastener locations based on panel size and application requirements
- Panel Marking: Clearly mark the centre point for each fastener on both the removable panel and fixed structure
- Alignment Verification: Double-check that marks on both panels align properly when assembled
- Centre Punching: Use a centre punch at each marked location to prevent drill wandering
- Panel Preparation: Ensure both panels are clean, flat, and properly supported for drilling
Taking time with this preparatory step prevents misalignment issues later.
Step 2: Drilling Mounting Holes
Precise drilling is critical for proper function:
- Pilot Drilling: Begin with a small pilot hole (2-3mm) at each centre-punched location
- Main Hole Drilling: Enlarge to the specified size for your Oddie fastener (typically 6-12mm depending on model)
- Step Drilling: For sheet metal, use a step drill to create clean holes without deformation
- Deburring: Carefully remove any burrs or sharp edges from both sides of each hole
- Hole Cleaning: Remove any drilling debris that might interfere with fastener mounting
Accurate hole sizing ensures proper component fit and fastener function.
Step 3: Installing the Receptacle (Fixed Side)
The receptacle forms the foundation of the fastening system:
- Receptacle Positioning: Place the receptacle over the drilled hole in the fixed structure
- Alignment Check: Ensure the receptacle is oriented correctly for proper stud engagement
- Mounting Method: Depending on receptacle type, either:
- Through-Mount Method: Insert screws through the structure into the receptacle
- Blind Mount Method: Use nuts and washers on the back side of the structure
- Rivet Mount Method: Use appropriate rivets for permanent installation
- Initial Tightening: Secure the receptacle loosely to allow for final alignment
- Panel Check: Verify the receptacle position allows proper panel alignment
The receptacle must be securely mounted while maintaining correct alignment with the stud.
Step 4: Installing the Stud Assembly (Removable Panel)
The stud assembly completes the fastening system:
- Stud Insertion: Insert the stud through the hole in the removable panel from the outer surface
- Retainer Placement: Position the retaining washer over the stud on the inside of the panel
- Nut Application: Thread the mounting nut onto the stud shaft
- Initial Tightening: Hand-tighten the nut while maintaining proper stud position
- Rotation Check: Ensure the stud head rotates freely through a full quarter turn
Proper stud installation ensures smooth operation and secure engagement.
Step 5: Final Adjustment and Testing
Fine-tuning ensures optimal performance:
- Panel Alignment: Position the removable panel against the fixed structure
- Stud Engagement Test: Insert each stud into its receptacle and rotate a quarter turn to engage
- Adjustment Needs: Note any difficulty in engagement that requires adjustment
- Receptacle Position Refinement: Loosen and reposition receptacles if needed for smooth operation
- Final Tightening: Once proper operation is confirmed, fully tighten all mounting hardware
- Thread Treatment: Apply thread-locking compound if needed for vibration resistance
- Operation Verification: Test each fastener through several engagement/disengagement cycles
This final adjustment ensures smooth, reliable operation throughout the fastener's service life.
Installing Oddie Fasteners in Specific Materials
Different substrate materials require specific approaches:
Sheet Metal Installation
For the most common application of Oddie fasteners:
- Recommended Hole Creation: Step drills create clean holes without deformation
- Material Thickness Consideration: Panels under 1mm may require reinforcement
- Edge Distance: Maintain at least 10mm from panel edges to prevent distortion
- Reinforcement Options: Consider backer plates for thin material
- Hole Protection: Use grommets in high-vibration applications to prevent hole elongation
Sheet metal installation typically provides excellent results with minimal complications.
Installation in Composite Panels
For plastic, fiberglass, or composite materials:
- Drill Speed: Use lower speeds to prevent melting or cracking
- Hole Quality: Ensure clean cuts without splintering or delamination
- Reinforcement Requirement: Often necessary to distribute load across the composite structure
- Hardware Selection: Use appropriate washers to distribute clamping force
- Torque Limitation: Be careful not to over-tighten and crush the material
Composite materials require careful hole preparation and appropriate hardware selection.
Aluminium and Lightweight Metals
For aluminium and similar non-ferrous metals:
- Drilling Technique: Use sharp bits and lubricant to prevent galling
- Thread Engagement: Ensure sufficient thread length for secure mounting
- Galvanic Corrosion: Consider isolation methods when mixing metal types
- Thread Inserts: Consider threaded inserts for thin material or frequent access
- Anti-Seize Application: Use appropriate compounds for stainless-to-aluminium connections
Proper technique prevents the common problems associated with softer metals.
Advanced Installation Techniques for Specialized Applications
Some applications require modified approaches:
Gasket and Sealing Integration
For weather-sealed or liquid-tight installations:
- Gasket Compression: Position fasteners to ensure uniform gasket compression
- Spacing Calculation: Typically required closer spacing than non-sealed applications
- Fastener Selection: Extended-reach variants may be needed to accommodate gasket thickness
- Sealing Verification: Test seal integrity after installation
- Compression Setting: Ensure fasteners provide appropriate gasket compression without over-compression
Proper installation ensures consistent sealing performance.
High-Vibration Environments
For applications subject to significant vibration:
- Thread Treatment: Apply appropriate thread-locking compound to mounting hardware
- Torque Specification: Tighten to manufacturer's recommended torque values
- Vibration-Resistant Hardware: Use lock washers or other vibration-resistant components
- Installation Verification: Check tightness after initial operation period
- Maintenance Schedule: Implement regular checks for high-vibration applications
These measures prevent vibration-induced loosening and ensure long-term reliability.
Security-Focused Installation
When unauthorized access prevention is important:
- Security Head Selection: Choose appropriate specialized head designs
- Tamper-Evident Features: Consider adding tamper-indicating seals or markers
- Tool Control: Restrict access to specialized operation tools
- Concealed Mounting: Position fasteners to minimize visibility or accessibility
- Recorded Patterns: For multiple fasteners, establish non-obvious patterns
Security applications require attention to both the fasteners themselves and the overall installation approach.
Troubleshooting Common Installation Issues
Even with careful planning, challenges may arise:
Misalignment Problems
When fasteners don't engage properly:
- Symptom: Difficulty inserting stud into receptacle or achieving full quarter turn
- Causes: Hole misalignment, improper component positioning, panel warping
- Solutions:
- Loosen receptacle mounting and reposition for better alignment
- Enlarge holes slightly to provide adjustment room
- Check for panel flatness issues and correct as needed
- Verify proper panel alignment before final fastener tightening
Proper alignment is essential for smooth operation and secure engagement.
Engagement Difficulties
When fasteners don't lock securely:
- Symptom: Incomplete locking, loose engagement, or easy disengagement
- Causes: Incorrect stud length, damaged components, improper installation
- Solutions:
- Verify correct fastener sizing for the application
- Check for damage to stud head or receptacle components
- Ensure proper receptacle mounting and orientation
- Confirm appropriate panel gap for the fastener style
Secure engagement depends on proper component selection and installation.
Operational Problems
When fasteners don't operate smoothly:
- Symptom: Stiff rotation, binding, or inconsistent engagement
- Causes: Overtightened components, burrs or debris, panel misalignment
- Solutions:
- Check for and remove any burrs on drilled holes
- Clean any debris from receptacle or stud components
- Ensure stud assembly has proper rotational freedom
- Verify panel alignment and adjust as needed
- Apply light lubrication if recommended by manufacturer
Smooth operation requires attention to detail during installation.
Maintenance and Long-Term Care
Ensuring continued reliable performance:
Routine Inspection Procedures
Regular checks maintain fastener functionality:
- Visual Examination: Look for signs of damage, wear, or corrosion
- Operational Testing: Periodically verify smooth engagement/disengagement
- Component Check: Ensure no loosening of mounting hardware
- Cleaning: Remove any accumulated debris that might affect operation
- Lubrication: Apply appropriate lubricant when recommended by manufacturer
These simple maintenance steps significantly extend service life.
Replacement Guidelines
Knowing when to replace components:
- Wear Indicators: Excessive play, incomplete engagement, or difficult operation
- Damage Assessment: Visible damage to stud head, receptacle, or mounting points
- Preventive Replacement: Consider replacing in critical applications before failure
- Upgrade Opportunities: Evaluation for potential replacement with newer designs
- Documentation: Maintain records of replacements for maintenance planning
Timely replacement prevents operational problems and system failures.
Special Considerations for Different Oddie Fastener Variants
Specific variants may require modified approaches:
Flush-Mount Oddie Fasteners
For applications requiring minimal protrusion:
- Countersinking Requirements: Create appropriate countersink for flush mounting
- Depth Control: Careful control of countersink depth prevents weakening the panel
- Tool Access: Ensure sufficient access for operation despite flush mounting
- Panel Thickness: Typically requires greater minimum panel thickness
- Installation Sequence: Often requires more precise component positioning
Flush mounting provides aesthetic and practical advantages but requires additional installation precision.
Extended-Reach Oddie Fasteners
For applications with significant panel gaps:
- Gap Measurement: Accurately determine the required reach length
- Support Consideration: May require additional support to prevent lateral loading
- Alignment Importance: Proper alignment becomes more critical with extended reach
- Engagement Verification: Ensure full engagement despite the increased distance
- Vibration Factors: Consider additional vibration resistance for longer fasteners
Extended reach variants solve specific application problems but require careful installation.
Miniature Oddie Fasteners
For space-constrained applications:
- Handling Challenges: Small components require careful handling during installation
- Tool Selection: Appropriate precision tools prevent component damage
- Material Limitations: Often require minimum material thickness for proper mounting
- Torque Control: Critical to prevent damage from overtightening
- Visual Aids: Magnification may be helpful during installation
Miniature variants provide solutions for tight spaces but demand greater installation precision.
Case Study Examples: Successful Oddie Fastener Implementations
Real-world installations demonstrate effective approaches:
Electronics Enclosure Application
A telecommunications equipment manufacturer improved field serviceability:
- Previous Method: Multiple machine screws requiring significant removal time
- Implementation: 8 strategically placed Oddie quarter turn fasteners
- Installation Approach: Precise template-based hole location with fixture mounting
- Result: Service time reduced by 85% with improved panel alignment and sealing
- Long-Term Performance: Zero fastener failures after 5 years in field deployment
Hall-Fast stocks a standard range of Oddie ¼ Turn Fasteners that are available to buy online in small quantities https://www.hall-fast.com/fasteners-small-components/quarter-turn-fasteners-locks we also supply customers in many industry sectors in bulk quantities, please contact us to discuss your specific requirements sales@hall-fast.com